

Favourites

Account

Basket
VAT:
Ex
Inc


The sound of a burst pipe is every homeowner's worst winter nightmare. Yet, once the temperature plummets, water pipes, especially those in unheated lofts, garages, and near external walls, are dangerously exposed. A burst pipe can cause thousands of pounds worth of damage, disrupt your home for weeks, and immediately shut down your water supply.
The good news? The best defence against frozen pipes is also one of the easiest and most affordable DIY jobs: pipe lagging. This simple foam insulation acts like a cosy winter coat for your plumbing, sealing in heat and keeping the bitter cold out.
Here at City Plumbing, the home of heating, we offer a quick and easy guide on how to prevent your pipes from freezing this winter. It covers identifying the most vulnerable spots, selecting the right materials, and sealing every joint for total protection.
How to Stop Your Pipes From Freezing Using Pipe Insulation
Lagging your pipes with insulation is one of the most effective ways to prevent them from freezing and bursting in the UK winter, especially in unheated areas.
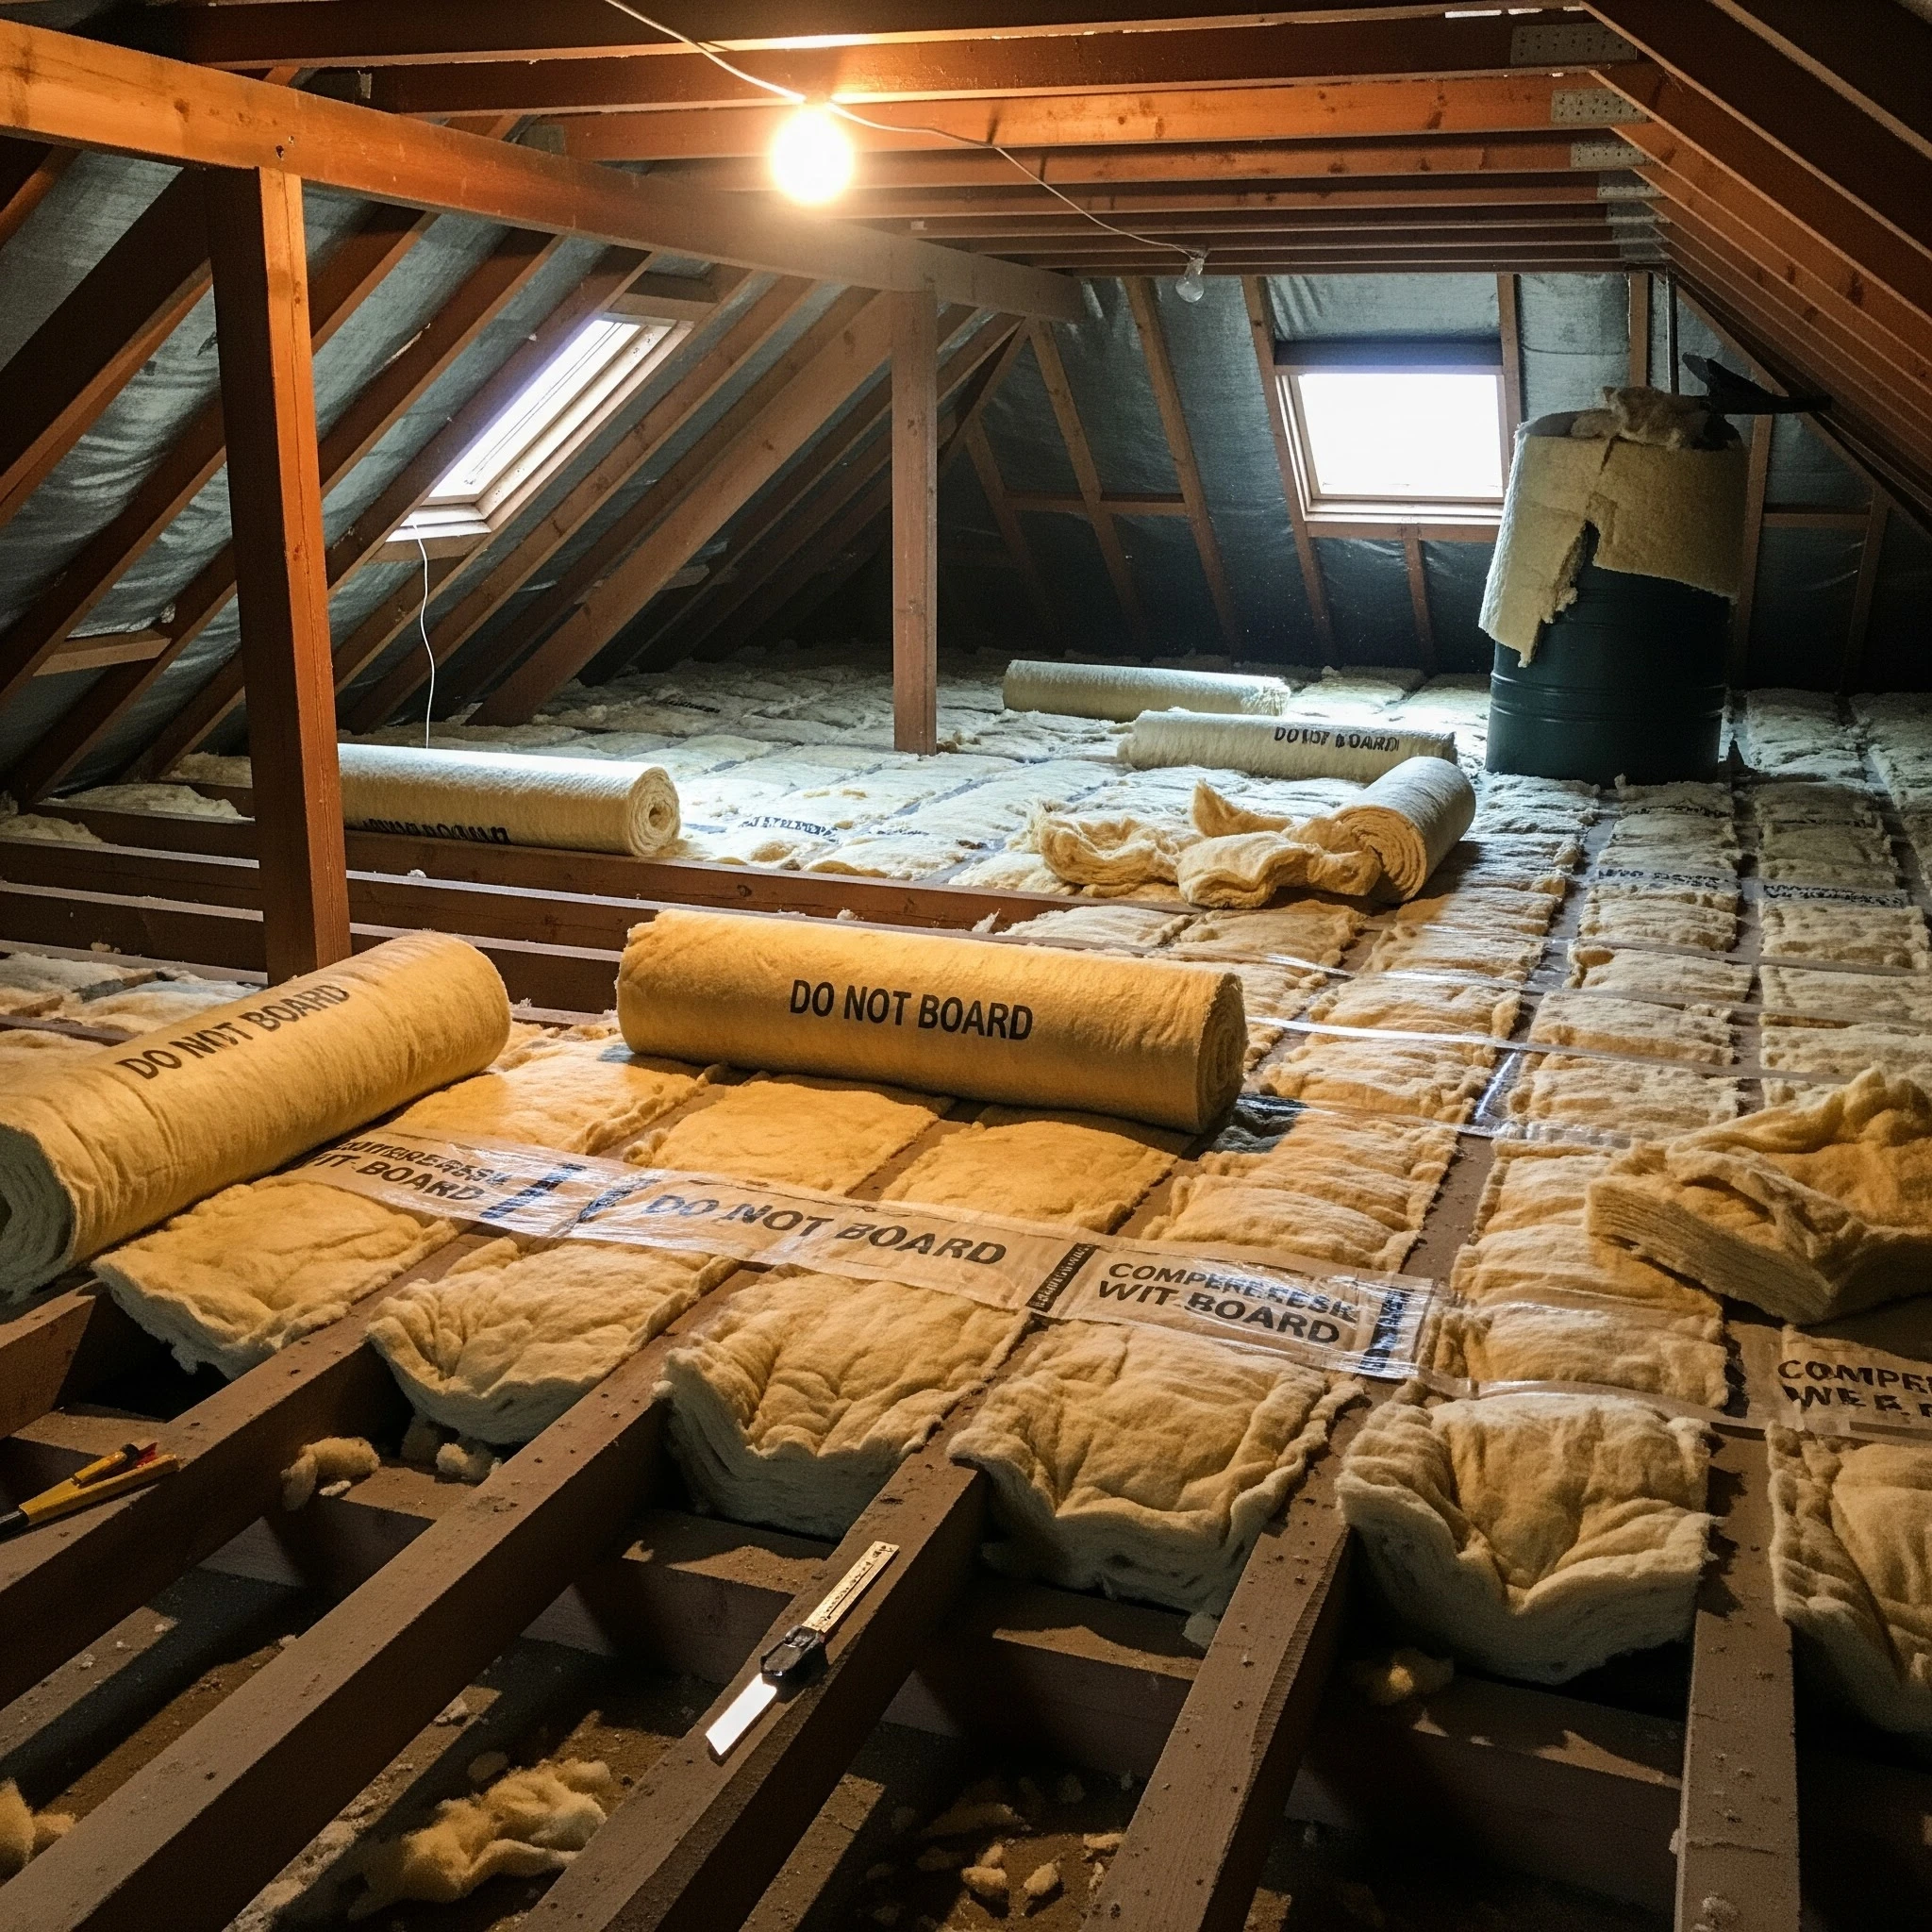
Step 1: Identify Pipes Needing Insulation
The most vulnerable pipes are those in unheated or exposed areas.
- Priority Areas:
Lofts/Roof Spaces: This is a top priority, as loft insulation keeps heat down in the house, making the pipes above colder.
Garages, Outbuildings, or Sheds.
Outside Pipes: Any exposed pipework outside your home.
Under the Kitchen Sink: Especially if near an external wall or a cold draught.
Any pipe running along an external wall.
Step 2: Choose and Measure Your Materials
You'll need the right size and type of pipe insulation. Here are the three most common types:
Polyethylene Foam - Grey Foam (The most common)
Best For: Domestic pipework (indoor and sheltered outdoor use).
Key Features: Easy to cut, very affordable, and readily available in DIY stores. It usually comes pre-slit for simple fitting.
- Pros (Advantages):
Very Affordable: The most cost-effective option for large projects.
Easy to Install: Lightweight and quick and simple fitting.
Widely Available: Easy to source from plumbing merchants and DIY shops.
- Cons (Disadvantages):
Lower Thermal Performance: Generally has a lower R-value (insulation rating) than other materials of the same thickness.
Less Durable Outdoors: Can degrade over time when exposed to UV light or harsh weather unless protected.

Nitrile Rubber (Class O)
Best For: Outdoor exposure, commercial applications, or pipework with tight bends.
Key Features: Highly flexible, offers excellent resistance to moisture and condensation. Often comes with a self-seal adhesive for tight joins.
- Pros (Advantages):
Excellent Moisture Resistance: Closed-cell structure resists water absorption and condensation, perfect for outside taps or cold water pipes.
Highly Flexible: Very easy to bend and fit around corners, joints, and tight spaces.
Good Durability: Resistant to UV and weather, making it superior for permanent outdoor pipework.
- Cons (Disadvantages):
More Expensive: Generally costs more per metre than standard polyethylene foam.
Requires Good Sealing: The self-seal joints must be perfectly pressed together to maintain the condensation barrier.
Mineral/Stone Wool (Foil-Faced Sections)
- Best For: High-temperature pipes, such as boiler flues or commercial hot water systems.
- Key Features: Provides excellent thermal performance and is highly fire-resistant.
- Pros (Advantages):
Superior Fire Resistance: Non-combustible, essential for high-temperature applications like boiler flues.
Excellent Heat Retention: The best option for retaining heat in long hot water pipe runs, improving energy efficiency.
High Density: Offers robust protection and structural integrity.
- Cons (Disadvantages):
Higher Cost: Typically, the most expensive type of lagging.
More Difficult to Cut/Fit: Less flexible; requires precise angle cuts for bends.
Requires Safety Gear: Can be dusty and cause irritation during cutting and installation (gloves and mask advised).
Summary Recommendation:
The best choice depends on the location: Foam for inside, Nitrile Rubber for outside, and Mineral Wool for high-heat applications.
Sizing and Thickness:
- Measure the Pipe Diameter (Bore): Standard UK domestic copper pipes are typically 15mm or 22mm in diameter. The lagging you buy must match the outside diameter of your pipe for a snug fit.
- Determine Wall Thickness: Thicker is better for cold protection. For exposed pipes (such as in a loft or outside), a minimum wall thickness of 19mm is often recommended for maximum protection. For pipes in less-exposed areas, 13mm is a common diameter.
- Measure Length: Measure the total length of all the pipe runs that need to be covered. Lagging typically comes in lengths of 1m or 2m.
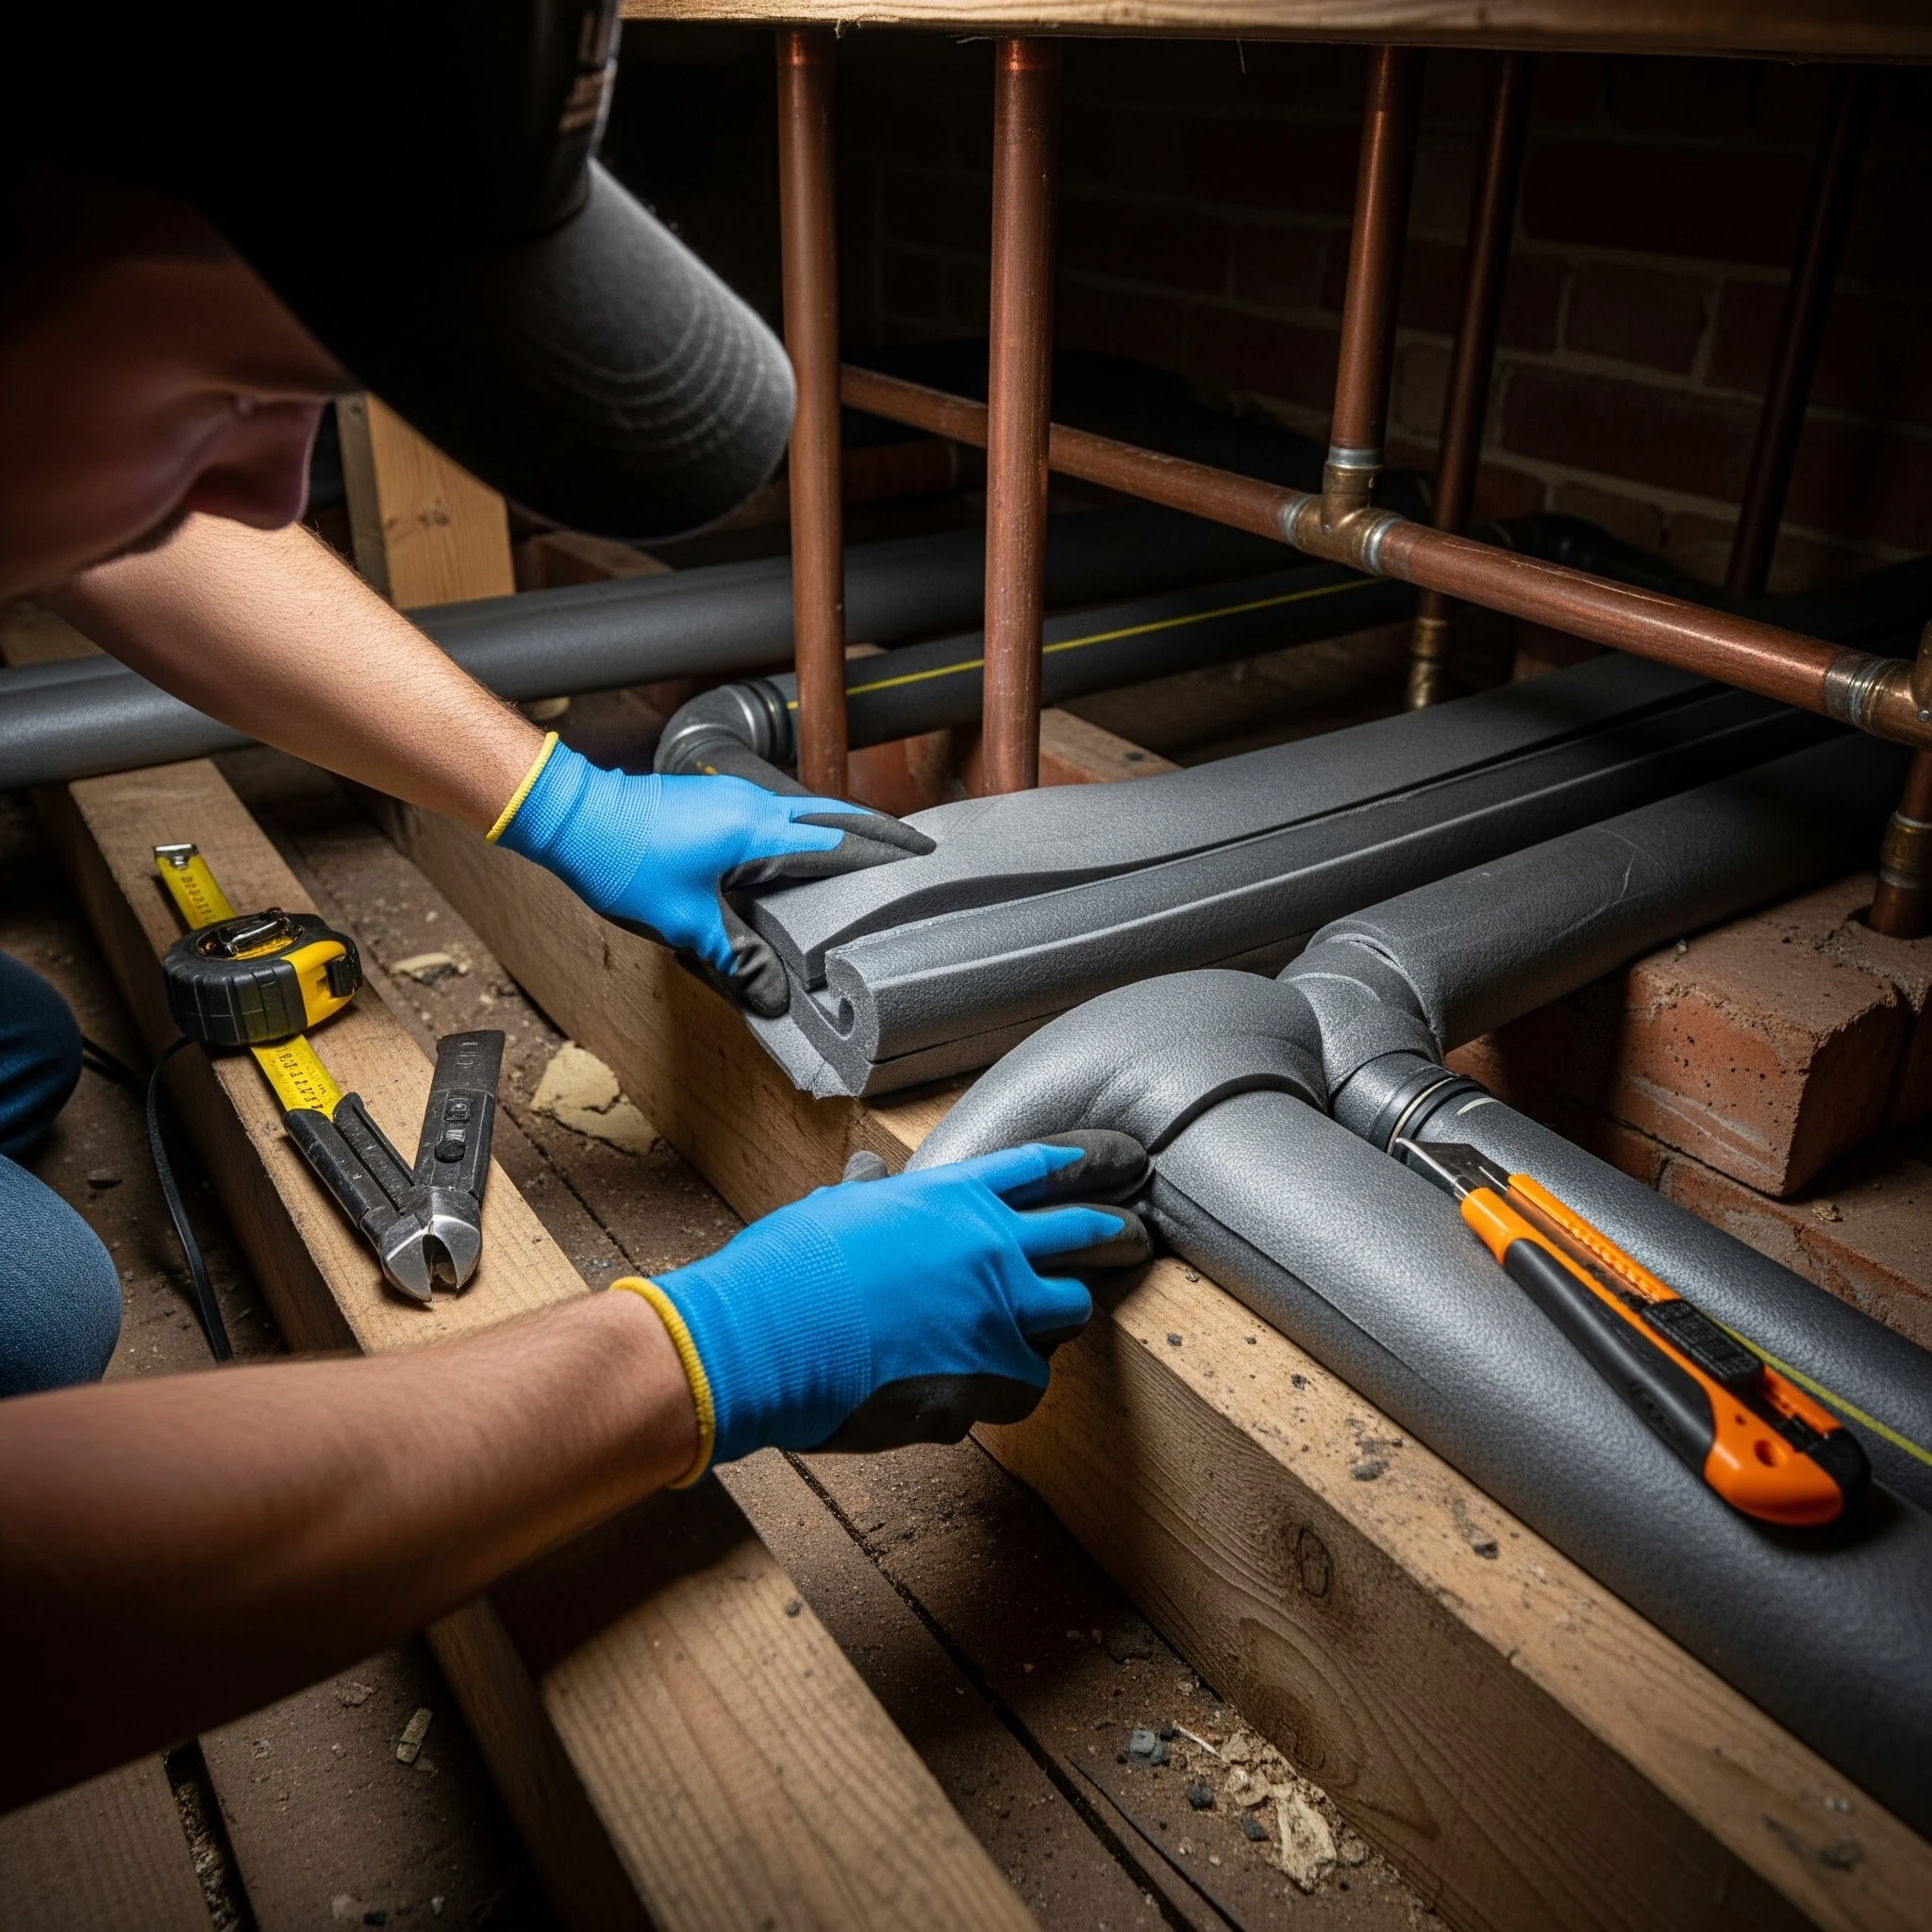
Step 3: Fit the Pipe Insulation
Insulating your pipes is a simple DIY task.
- Cut to Length: Measure a section of pipe and use a sharp knife or scissors to cut the lagging to the correct length. A mitre box can help you get clean 45-degree angles for bends.
- Slide it On: The standard foam lagging comes with a slit down one side. Open this slit and press it firmly over the entire length of the pipe.
- Seal All Gaps and Joins: This is crucial—any exposed section is a vulnerability.
- Self-Sealing Lagging: If your lagging is self-sealing, simply press the slit edges together firmly.
- Non-Self-Sealing Lagging: Use insulation tape (such as duct tape or strong electrical tape) to seal the slit, especially along its length.
- Joins and Bends: Use the insulation tape to seal where one section of lagging meets another, or where it bends. Seal the area as tightly as possible to prevent cold air from entering.
Buy Pipe Insulation at City Plumbing
City Plumbing offers a vast selection of pipe insulation at some of the most competitive prices to keep you on budget this season. From industry-renowned brands such as Armaflex, Celafelt, Climaflex, Condensate Pro, Davant, Dupre, Inta, Plumbright, and Primary Pro, we stock a variety of depths and lengths to select from to suit your needs.
Extra Winter Protection Tips For The Home
Insulation works best when combined with other simple measures to keep your home warm:
Insulate Outdoor Taps: Fit an inexpensive tap cover (or tap jacket) over any exposed outdoor tap to prevent heat loss.
Fix Dripping Taps: Even a small trickle of water can quickly freeze and block a pipe.
Keep the Heating On: If you are away or the temperature drops significantly, leave your heating on a low setting (e.g. 16°C) or set it to come on periodically. This keeps water moving and slightly warms the area around the pipes.
Open Loft Hatches: During very cold spells, leave your loft hatch slightly ajar to allow warm air from the house to rise and circulate around the pipes in the loft space.
Secure Your Home Ready for the Winter
Lagging your vulnerable pipework is not just a maintenance task; it's a vital insurance policy against the worst winter has to offer. By taking a few hours to fit the correct insulation and thoroughly sealing all joints (as outlined in Step 3), you eliminate the most common cause of winter plumbing failure.
Don't wait until the first hard frost arrives. Check your unheated areas now, gather your supplies, and ensure your home is watertight and ready for the cold snap.
If you’re looking for helpful advice and suggestions on the best ways to keep your home warm and on budget this winter, take a further look at the City Plumbing website for more information.
Help & Feedback
 Chat With Us
 Give Us Feedback